Hey everyone! I thought you all might get a kick out of hearing some of the behind the scenes recordings from our Three Habeneros song.
Note that the solo versions of the songs haven’t gone through normalization. They are very raw, but we hoped you might get a kick out of hearing them anyway. 🙂
First up, here is the instrumental version(performed by James Mulvale) of the song without any vocals:
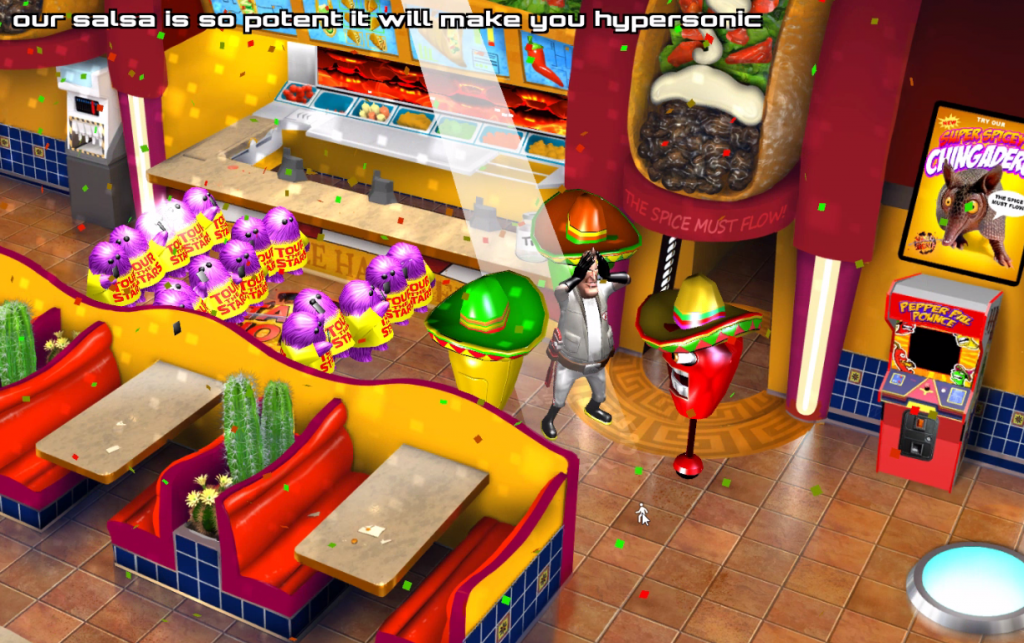
We’re Three habaneros
Three gay habaneros
We love to sing for you in our sombreros
We welcome you our winner
Free Breakfast, lunch, or dinner
And though your meal is free, does not include gratuity
Our tacos HOLY MOLE!
Much better than Chipotle
and you don’t have to worry ‘bout e-coli
Our spices are atomic
explosive, Gastronomic
our salsa is so potent it will make you hypersonic
Oh please try our chingadero
Deep fried in it’s own bowl,
made with our special dough
So crunchy and spicey
but not all that pricey,
it’s three times as nicey
When you get it to go.
We’re Three habaneros
Three gay habaneros
We love to sing for you in our sombreros
We’ll sing for you all day but to stop us you must pay.
Yes, here at Taco Nova it’s the customary wa-aay.
Heres a peek behind the scenes of a short animated sequence I needed in the game.
In our story, Centari Corp produces a VR game console called the ‘Facebox’. From the beginning, the concept for this Facebox appliance was to have a sleek appearance but with something sinister about it under the hood. To reinforce the sinister aspect, we wanted to show Faceboxes being mass produced on an assembly line. The point was to reveal their menacing skeletal innards being encased in a more user-friendly outer shell. The video reveals a little bit of how the effect was achieved.
We used 2D pre-rendered artwork (as with the rest of the game) but mapped it onto simple 2.5D shapes to enhance the illusion of depth. I wanted the outer shell to look like it was actually being 3D printed over the skeleton. To achieve that effect we used a nifty ‘invisible mask’ shader on a flat quad that hides the 3D shell mesh from the camera. But as we animate the invisible mask shape downward, it exposes the shell mesh as it passes through it. Hopefully what I’m trying to describe is more clear in the video.
I really had a good time putting this little sequence together for the game and just figuring out how to make it work was a fun challenge. Kinda like solving an adventure game puzzle. 🙂
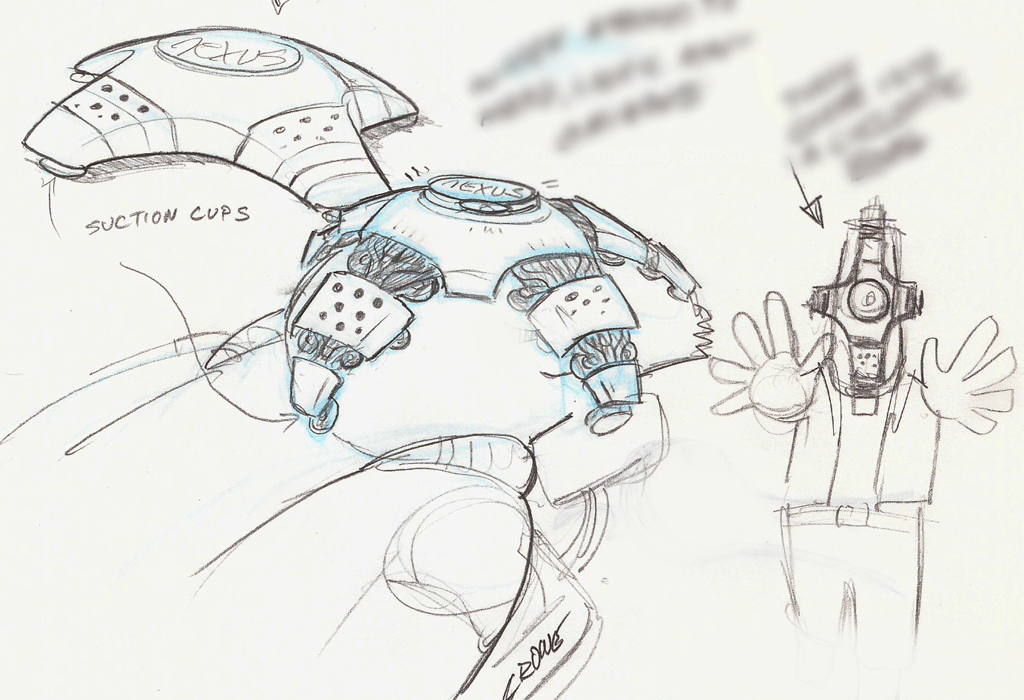
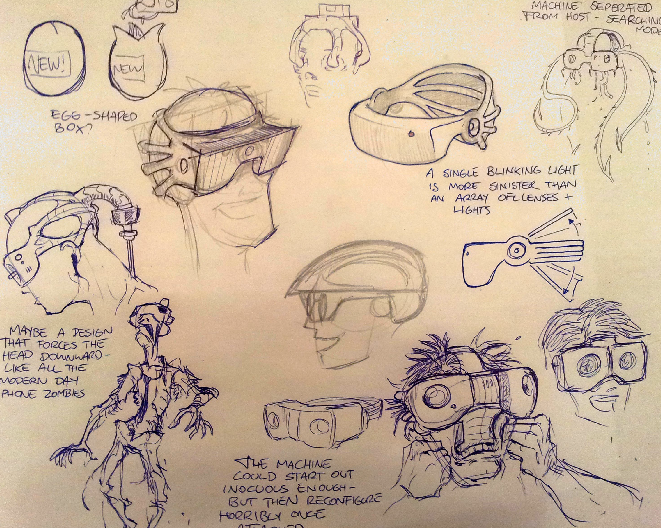
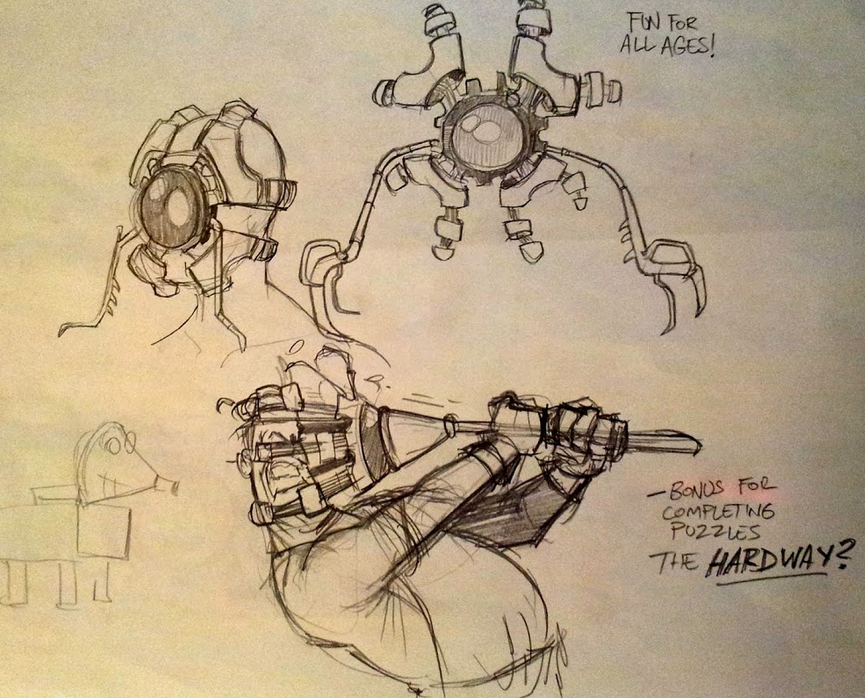
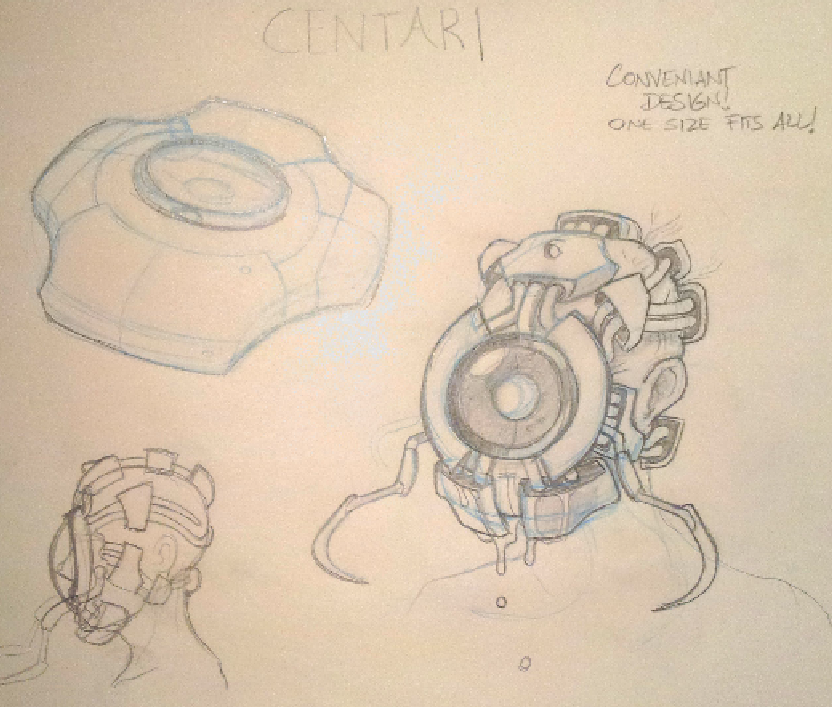
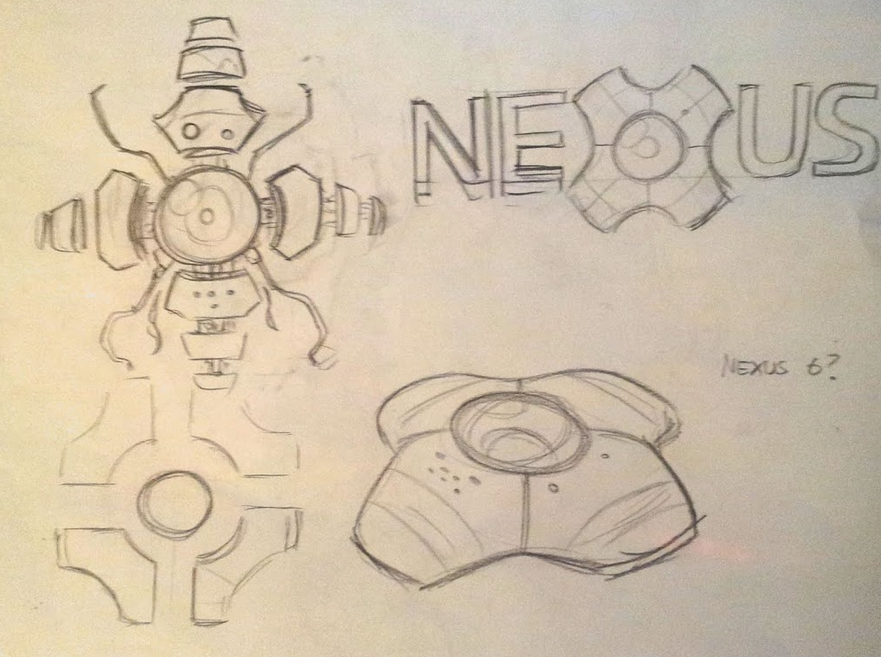
As an added treat, here is some early concepts from artist Brent Forest (and yours truly) showing the evolution of the Facebox appliance.
My initial concept
Brents awesome sketches. Very disturbing. Brent captured the menace perfectly. But who in their right mind would wilfully strap one those to their face, right? So we dialed it back. But then reintroduced the alien-like menace by showing the inner workings of the Facebox in the assembly line sequence.
Image from a April fools Press release we did in 2016
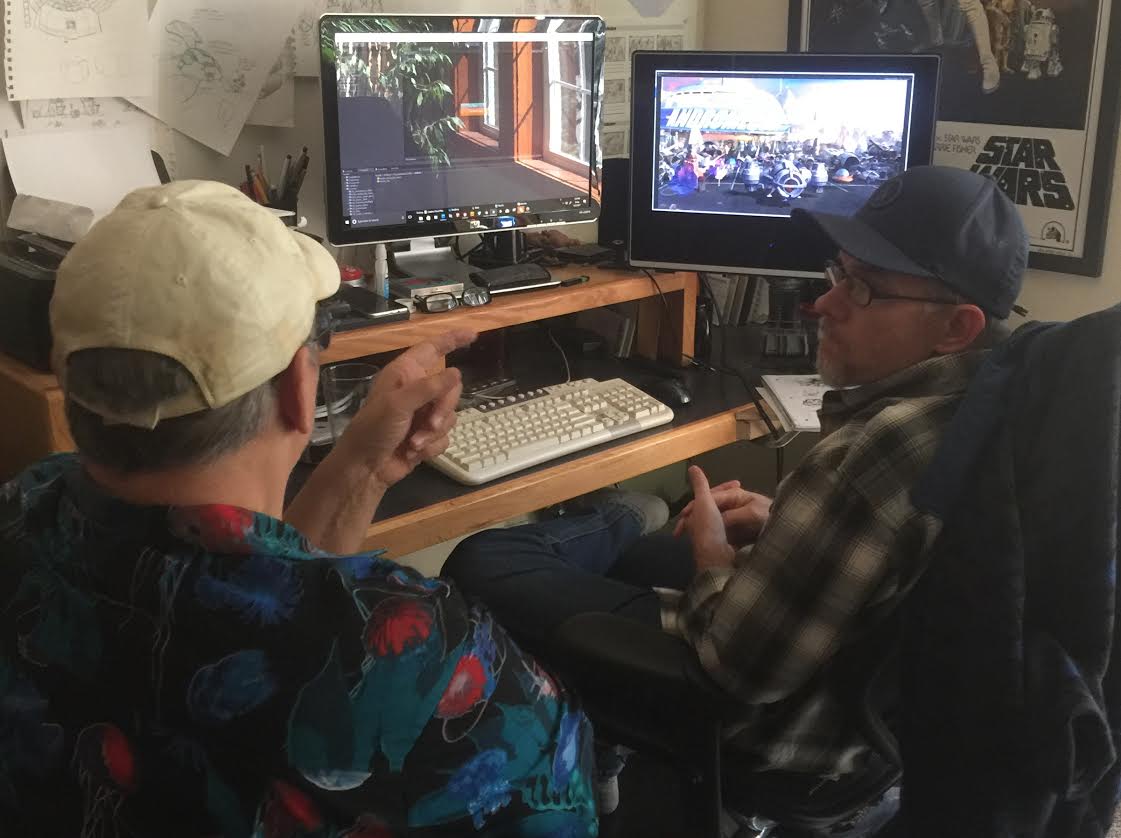
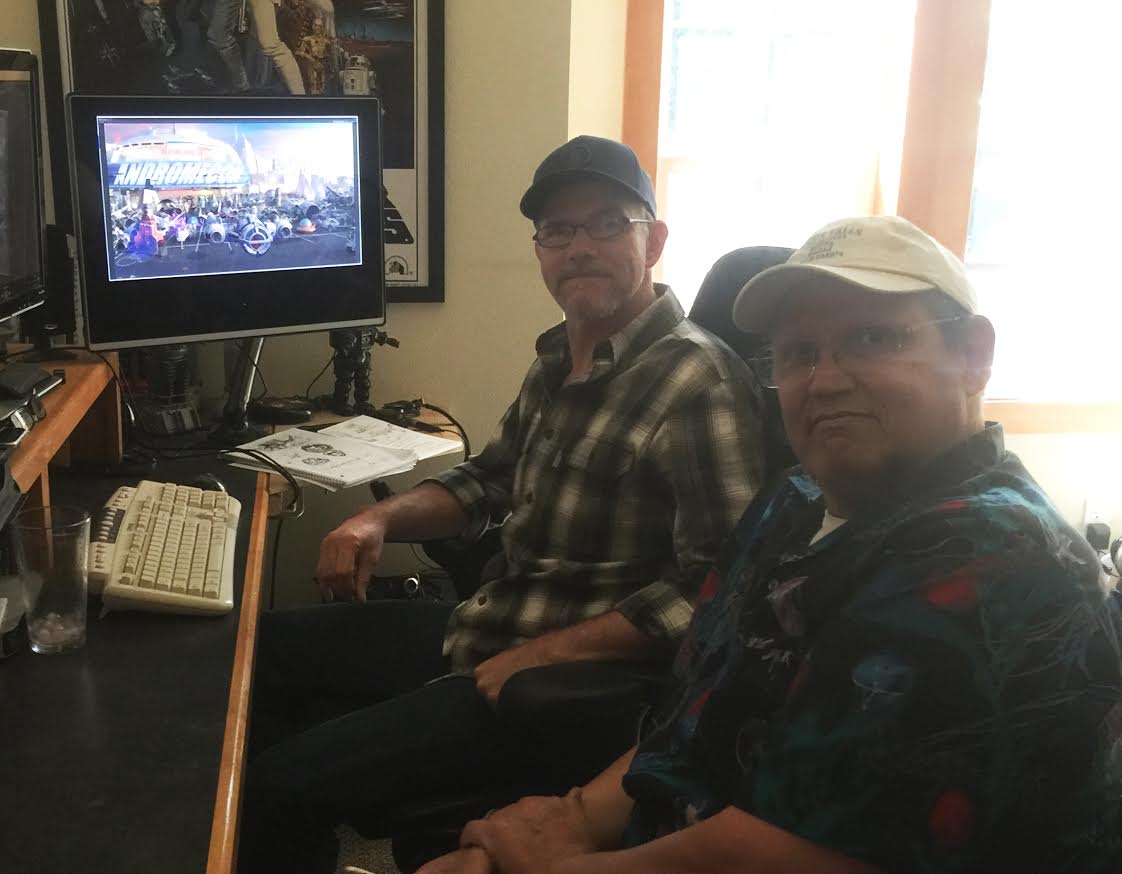
Hey Gang, I meant to include this post with the recent update. Several weeks back I had the pleasure of meeting up with Mr. Ken Allen who dropped by the Crowe’s nest while he was in the area on business. We went over music and audio needs for a couple of scenes and grabbed some pizza together. (Sorry there was no Pizza Factory within a 200 mile radius, Ken).
Ken’s based in Vegas, which explains is why he looks like he just got back from hauling marlins down in Cabo while I’m rockin’ the flannel in my chilly workspace.
Hey everyone! Here is a quick video of me discussing some of the mechanics of making the sphere puzzle sequence work near the end of SpaceVenture. This will be part of our behind the scenes content once the game is released.
Howdy All!
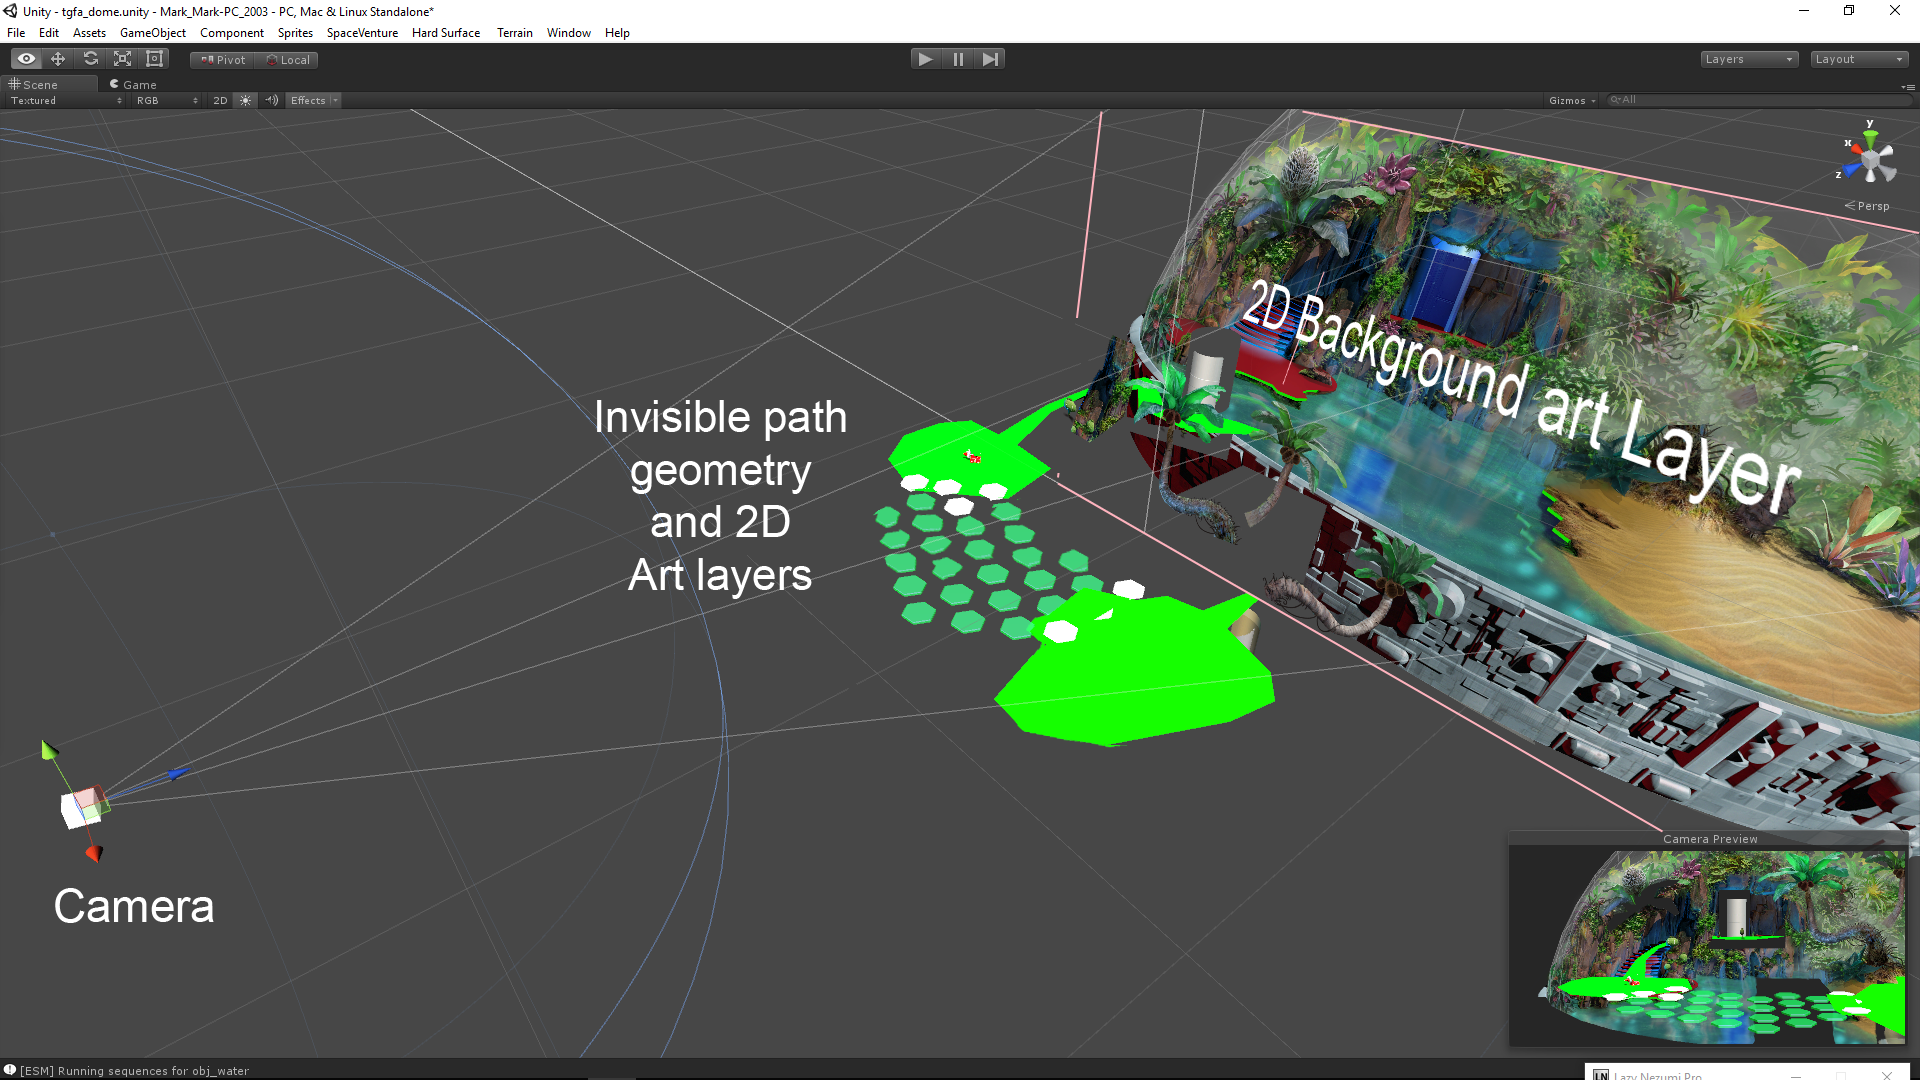
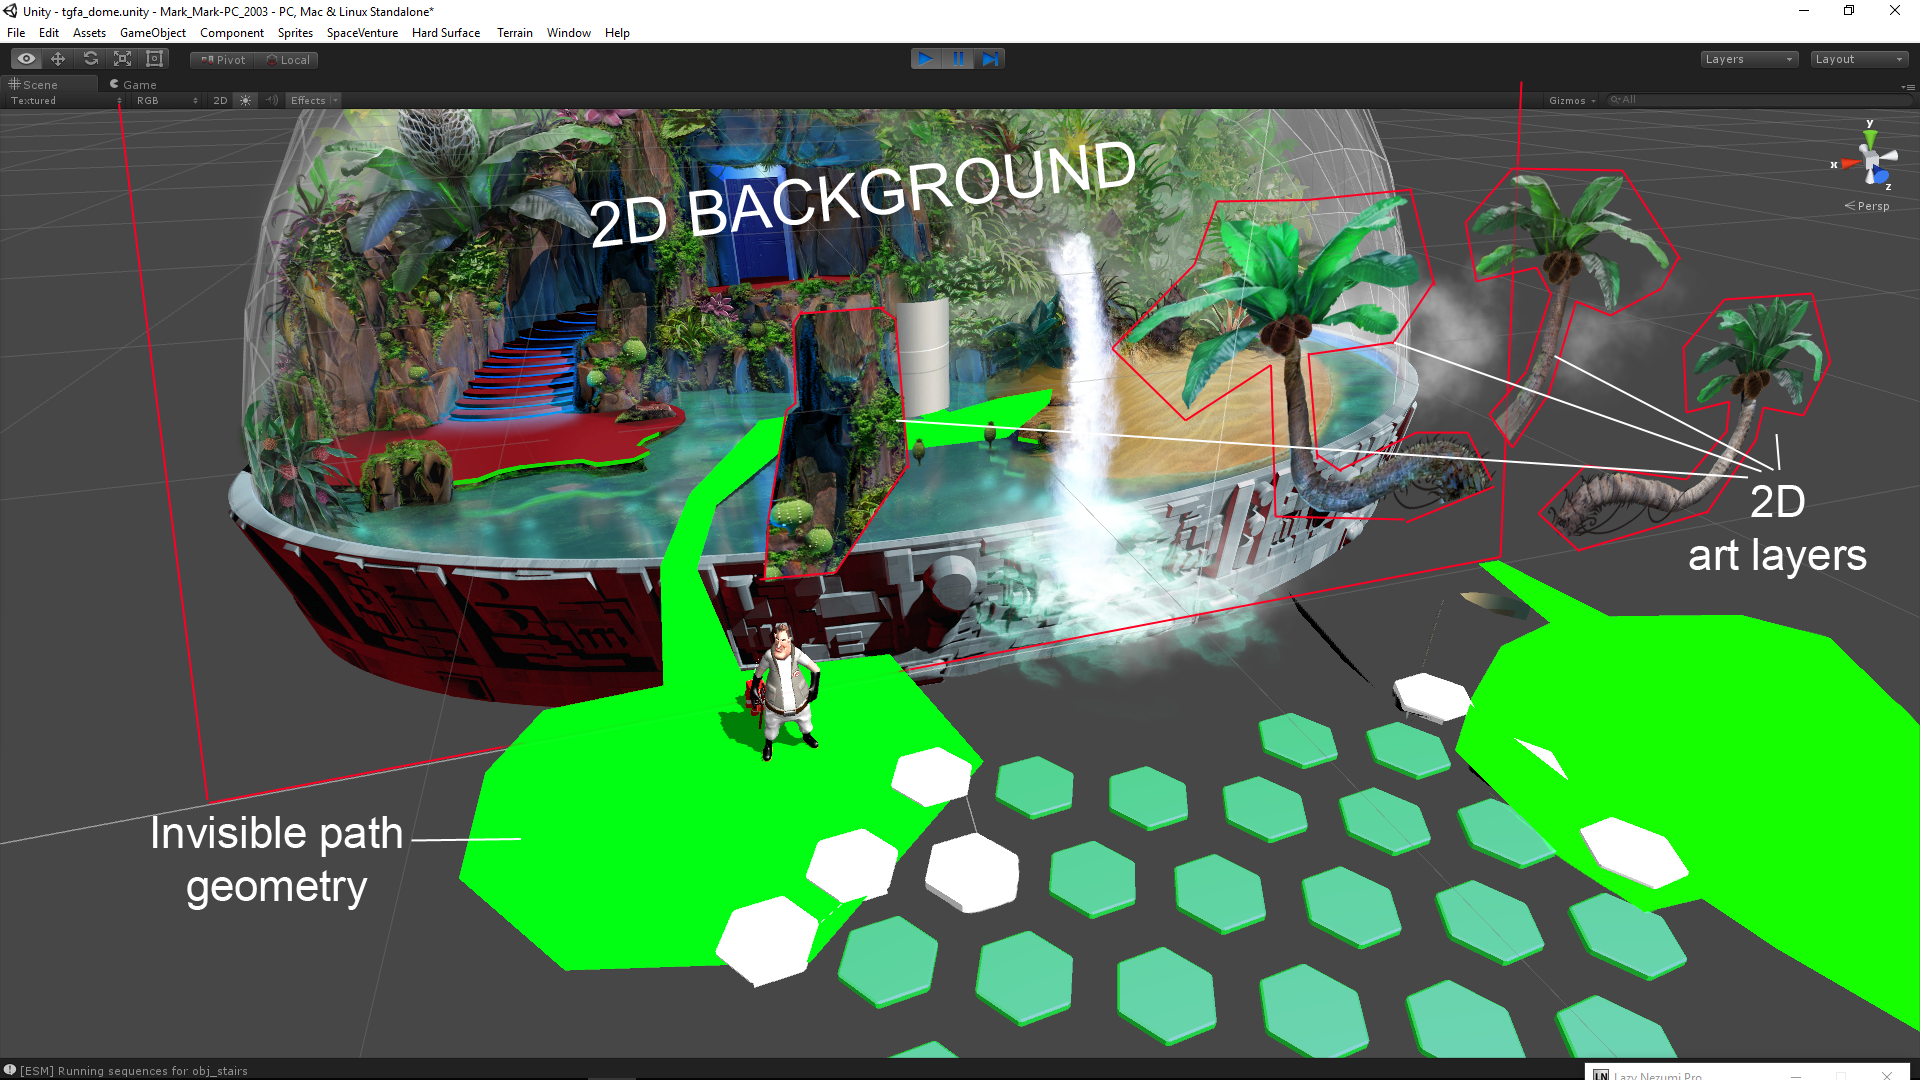
I thought some of you might find it interesting to take a peek behind the curtain to see how our ‘2.5D’ scenes are set up in Unity. I put together a couple images of the new Dome scene showing the various components that allow our 3D Characters to walk around and interact with a 2D background.
The process starts with creating 3d path geometry that perfectly aligns with the 2D background art from the Camera’s POV. This path geometry is the physical ground that the 3D characters walk around on in 3D space.
The next step is creating polygonal ‘mask’ shapes that occlude the characters depending on where they are in 3D space, e.g., behind the rock or in front of it. The mask polygons are created by tracing the outline of objects in the 2D background art (rock, tree, etc) then positioning the polygons in 3D space, in front of the camera,and visually aligned with the background art. An ‘InvisibleMask’ material applied to these mask shapes occlude (hide) the 3d characters when they walk behind them while allowing the background art to show through- effectively acting as an ‘invisiblity cloak’ to the 3d character.
Lastly, we add a bunch of invisible 3D boxs with collider scripts for each and every interactive element represented in the 2D background artwork. These serve a couple purposes: Mainly, they are for detecting your mouse clickity-clicks within the scene. But they also serve as ‘LookAt’ and “WalkTo” targets for the characters. So when you the Player clicks on a item of interest, Ace turns to face that object in 3D space and/or walks to that location.
I hope this look at the technical side of scene creation was of interest.
As I’m sure you guys can guess, things don’t always go as planned in the development of certain scenes within the game creation process. Here is a small video planned for the blooper reel. It’s titled, “Rooter Has Worms”.
Hey guys, to go along with our most recent project update, I wanted to throw out another small treat. Here is our original design concept for how players will utilize the SpaceVenture navigation system. The Space navigation system will help you get to the different locations in the game that happen to be extremely distant from one another.
In SpaceVenture, we want to simulate piloting your own craft through the SV galaxy as much as possible, giving the player a feeling of freedom to explore and choose their destination. The goal is to do something visually exciting and interactive that takes advantage of 3D. The game navigation will use a 3D jumpgate system where players actually pilot their ship around small planetary systems connected by a web of jumpgate corridors to a Hyperspace Expressway (a track with turn points). the galaxy *road map* might look something like this:
ORIGINAL CONCEPT:
The turn points (or nodes) represent highway on/off ramps where the player can turn to access planetary systems or alter their course on the track map.
Piloting down the Hyperspace Expressway and turning off correct exits:
When in Hyperspace (track) mode, Ace appears to be speeding through a wormhole at warp speed along with other ships. This should feel like being on a busy freeway (or a pod race). vehicles can bump into each other.
Piloting through planetary system to approach desired destination:
After taking an exit off the Hyperspace expressway, the player is now piloting at sub light speed through a small planetary system in free flight mode. The player pilots the ship to a waypoint indicator to their desired destination.
I hope you all have enjoyed this small peek into the original concept behind our SpaceVenture ship navigation 🙂
As previously mentioned, the Cluck Yegger portion of SpaceVenture has been planned since the beginning. In the beginning however, we didn’t have a clear idea of how we were going to make this sequence fun. We ended up deciding on a Five Nights At Freddy’s style game play parody because the game mechanics seemed to work well with what we hoped to accomplish with the Cluck Yegger sequence. Not to mention, what would a Two Guys From Andromeda game be without parodies! 🙂
With various team members being tied up, and Scott having to deal with some major personal set backs, Mark and I decided to tackle design, programming, and artwork between the two of us. We were able to put a prototype together within a week that had four rooms and some mutant chickens(actually the Chickens were generic objects) that could move between scenes. Perhaps in a later post, I’ll publish the prototype out for everyone to have a look at. It wasn’t much, but will show how far things have come at least.
The decision was eventually made that there would be two locations that the player could monitor, the BFC Facilities, and Cluck’s ship. Originally, we wanted to allow Cluck to actually be able to travel from the Cockpit of Cluck’s ship, then outside and enter the BFC Facilities, but after awhile we decided not to go that route due to the amount of time and coding it was going to take. That feature ultimately wasn’t going to add much more to the game, considering we could potentially achieve the same results using cameras.
After mapping out what each scene would be, and how they were all connected, I had to begin writing the code for the Chicken AI. I had a basic Chicken AI script written that I had created for the prototype, but at that time, I didn’t know what all the scenes would be. Eventually, we sat down talked about the paths each Chicken would take throughout the game. Mark created a flow chart that we could use to keep things straight. I rewrote all the Chicken AI code based on the flow chart you see below.
One of the challenges facing any team is making sure everyone’s on the same page. This is doubly so for teams working together entirely virtually, as is the Guys from Andromeda team working on SpaceVenture. We have people collaborating from around the world trying to accomplish tasks, and trying to accomplish everything using e-mail, phone, or chat would be daunting. Fortunately, the Internet has provided us with a number of ways to work together, some of which have worked better for our team than others. In this article, I’ll talk about what’s worked for us and what hasn’t. This might turn into a bit of a rant, but hopefully it will be less technical than last week’s.
The early days
Google Drive allows for easy collaboration on scripts, etc.
We started out using Google Drive for collaboration. Mark and Scott used it extensively to work up the overarching SpaceVenture plot, as well as breaking down each section into scenes. Spreadsheets on Google Drive were also used for the first version of the narrative. The tools available through Google Drive made it possible to restrict access to the files while ensuring we would be able to work together on them and see edits in real time. While the narrative branched out into different tools, the plot document still has its home on Google Drive, and a few other (mainly text-based) documents are shared there.
We also started using Basecamp to assign tasks and discuss objectives, how things needed to be implemented, etc. This certainly was better than trying to use e-mails and we adapted pretty quickly to getting things done this way. While Basecamp continues to provide a great place to discuss the project, we needed a way to assign priorities, bug categories, and have something that focused more on software development than simple project management. After a bit of research and internal discussion, we settled on JIRA to accomplish this.
Dropbox was used early on for sharing of larger files such as images, and later Unity builds. We still use Dropbox for sharing out internal builds for team members that don’t have Unity as well as in-progress art or audio files, but Unity scenes and the project itself are now stored separately in its own dedicated version control.
Unity and version control
Unity’s Asset Server
We started off trying to figure out the best way to share Unity files. Several methods were tried (including Dropbox at first) but we eventually settled on Unity’s built-in Asset Server. This worked great for a long time. It had the benefit of being built-in to Unity, so there wasn’t a lot of requirements on the developers to shuffle another program to get situated. Updates were pretty easy and file conflicts were pretty simply handled.
One early problem was the inability to ignore certain files that didn’t need to be committed (for example, a plugin that integrates Unity with Visual Studio causes issues for other developers so I had to leave that uncommitted). But overall the asset server worked great. The problems with it started surfacing towards the end of last year. The server crashed, and while I was able to recover all of the data and rebuild, there was a lingering sporadic error that kept popping up when one of us would try to commit. In researching it I ascertained that Unity isn’t really supporting the Asset Server anymore (…great) and is instead pushing developers off onto other solutions.
Well, okay. I felt we had some time. The asset server was still working fine (minus the errors), it just lacked some of the robustness of real version control software. For the rest of 2014 I looked around for solutions. One of the problems with Unity is the lack of built-in support for version control besides a select few – there are plugins for others on the Asset Store, but they seemed dubious at best. In the end I decided to go with Bitbucket’s hosted solution – I felt they had a good reputation and their SourceTree software package was one of the most friendly – yet robust – version control tools I had seen. Plus, it integrated with JIRA (being made by the same people). So we went with that.
Bitbucket
The dreaded meta file
As I mentioned, Unity doesn’t play very well with external version control systems – if you want to do that, you have to turn on meta files, which basically store information about the import settings of the file. When a person adds, changes, or deletes a file and tries to commit that change, they need to commit the change to the pertinent meta file as well. This seems fairly straightforward, but if you think that commits often involve a large number of files across a number of directories, they can sometimes get overlooked. Then, when another person retrieves the commit from the server, their copy of Unity will assume it to be a new file and create its own meta file. This would be OK in most cases if the default settings were all that was stored, but the meta file also incorporates a GUID which makes that new copy of the meta file completely unique from the original one. So reconciling everything quickly becomes a headache.
Subsequently, I started to notice a bunch of empty directories popping up. Huh. Apparently with this configuration Unity also makes meta files for directories, even if they’re empty…but empty directories don’t show up in SourceTree (or many other version control tools, for that matter). When someone pulls down a folder meta file for a directory that doesn’t exist, Unity will actually create that directory, instead of just deleting the meta file. Thus, the problem can snowball pretty quickly.
We eventually worked around these issues through a Unity editor script that automatically deleted empty directories (after a while, so you wouldn’t just create a directory and have it deleted) as well as using branches to avoid constant meta file collisions. This too, worked for awhile. But then Bitbucket informed me that our repository size was nearing 2GB and they were going to shut off commit access when it hit the 2GB point. Oh, fantastic…
Right, moving on…
The main culprit behind the repository size is the large binary assets (art/audio) which can’t be differentiated line-by-line like the text assets (scripts, narrative, etc). This means that every revision where the binary assets were changed stores an entirely new version of the file, no matter if the whole image changed or just one pixel. With an artist like Mark Crowe plus a sound designer like Ken Allen working behind the scenes these assets build up quickly. More research into the matter showed that this is becoming increasingly common with large game projects and their high-fidelity assets.
I found that Git itself starts to become unstable as a repository goes over 1 GB. We were seeing this too – operations were timing out and refreshing the repository was slow. Solutions included splitting off the art assets into a solution like Dropbox – which is difficult with a set up like Unity where the code and art is all in one folder. You could have sub-folders for each under the main Unity assets folder but this starts to get dicey and information could be lost or people may not have the latest versions of all the assets. Plus with Dropbox you essentially lose many abilities of version control – being able to go back to a previous version, etc. There are solutions to automate this but they are not built into the base Git design so they feel a bit flaky themselves.
Perforce
The Perforce P4V version control client software
Another option for us was to switch version control systems yet again. A bit more research led me back to something I had dismissed previously – Perforce. While it has been used a long time by game development companies, Perforce also has a bit more overhead as far as setting it up goes. Each computer being used with it needs its own mapping to the repository – called a “workspace” when set up – and takes a bit more effort on the part of each developer to get established. So I had dismissed it in favor of the easy to use SourceTree. But now I looked at it a bit more closely. Perforce is one of those systems that integrates directly with Unity, meaning the meta file problem would not be a factor anymore. Plus, when I mentioned it, Mark and Ken both said they had experience with it in the past (it being basically an industry standard and all), so it seemed more and more like a better option. Also, Perforce comes from a background of a repository design that is more centralized; while Git or Mercurial are distributed systems, Perforce is closer to SVN or CVS in that the server is the authoritative version and each client works within that single repository. This makes version conflict resolution closer to the Unity Asset Server.
That’s about where we are now. Perforce has been working pretty well. The familiarity some of us have had with it made the transition less painful than I’d have expected. We switched over to the P4Connect Unity plugin (designed by Perforce) rather than the functions that come with Unity – the plugin seems to catch file changes better and checks them out on open so that they show up on your to-submit list, making committing later a lot easier.
Next time, fulfilling an old request, “Dos and Don’ts of Adventure Game Programming in Unity”.
A while back, Tyler promised inside coverage of the Narrative. I figured it’s about time to get into that. This post gets a bit technical, so I apologize now if this is boring to you, but hopefully some of you will find it interesting.
As Chris mentioned in a Kickstarter update, the Narrative Editor provides a means of directly editing the script without digging deep into the code. One of the issues we faced when first looking to tackle SpaceVenture is that there isn’t really anything out there that can incorporate narrative text and audio, associating them with objects in game and have it parse-able by code. (If anyone knows of something that DOES address all this, I would be interested to see how it was done; we found several that addressed it partially but for one reason or another none of them really worked). So we had to create one from scratch.
The team’s first quick and dirty solution (basically right after the Kickstarter ended) was to store the lines in a spreadsheet, stored on Google Drive for collaborative editing. This actually worked pretty well for what it needed to be – easy editing, uncomplicated design for the narrative writers, and mostly compatible with Unity – and was exported to CSV to import into Unity, which would then parse it.
The narrative editor
Old narrative editor
Well, as the script got larger this became unmanageable, as you might imagine. Tyler designed a SQL-backed narrative editor which could export to the same CSV format and so basically was able to quickly replace the old spreadsheet system.
The CSV format is great for a lot of things, but it’s designed to be a spreadsheet format more than a database. Once it got into Unity, the code to read the lines on-screen had to do a lot of parsing to make sure the right line was being retrieved, and a lot of patching to add alternative uses of the narrative meant that there were a lot of exceptions and it could break pretty easily.
Another problem was that this was highly dependent on scenes and objects. While you might think this is a proper way to go about it, this reasoning does lead to a lot of duplication of lines. Sure, the Guys like to have a lot of variety in their narrative, but there can be a lot of repeated lines even trying to avoid it (which is something I learned first in earlier fan-game work). Also, once you start getting into cutscenes and events not directly tied to objects or even scenes (think characters like Ace or Rooter which cross between scenes without necessarily changing narrative) this becomes a headache trying to make it work.
A fresh start
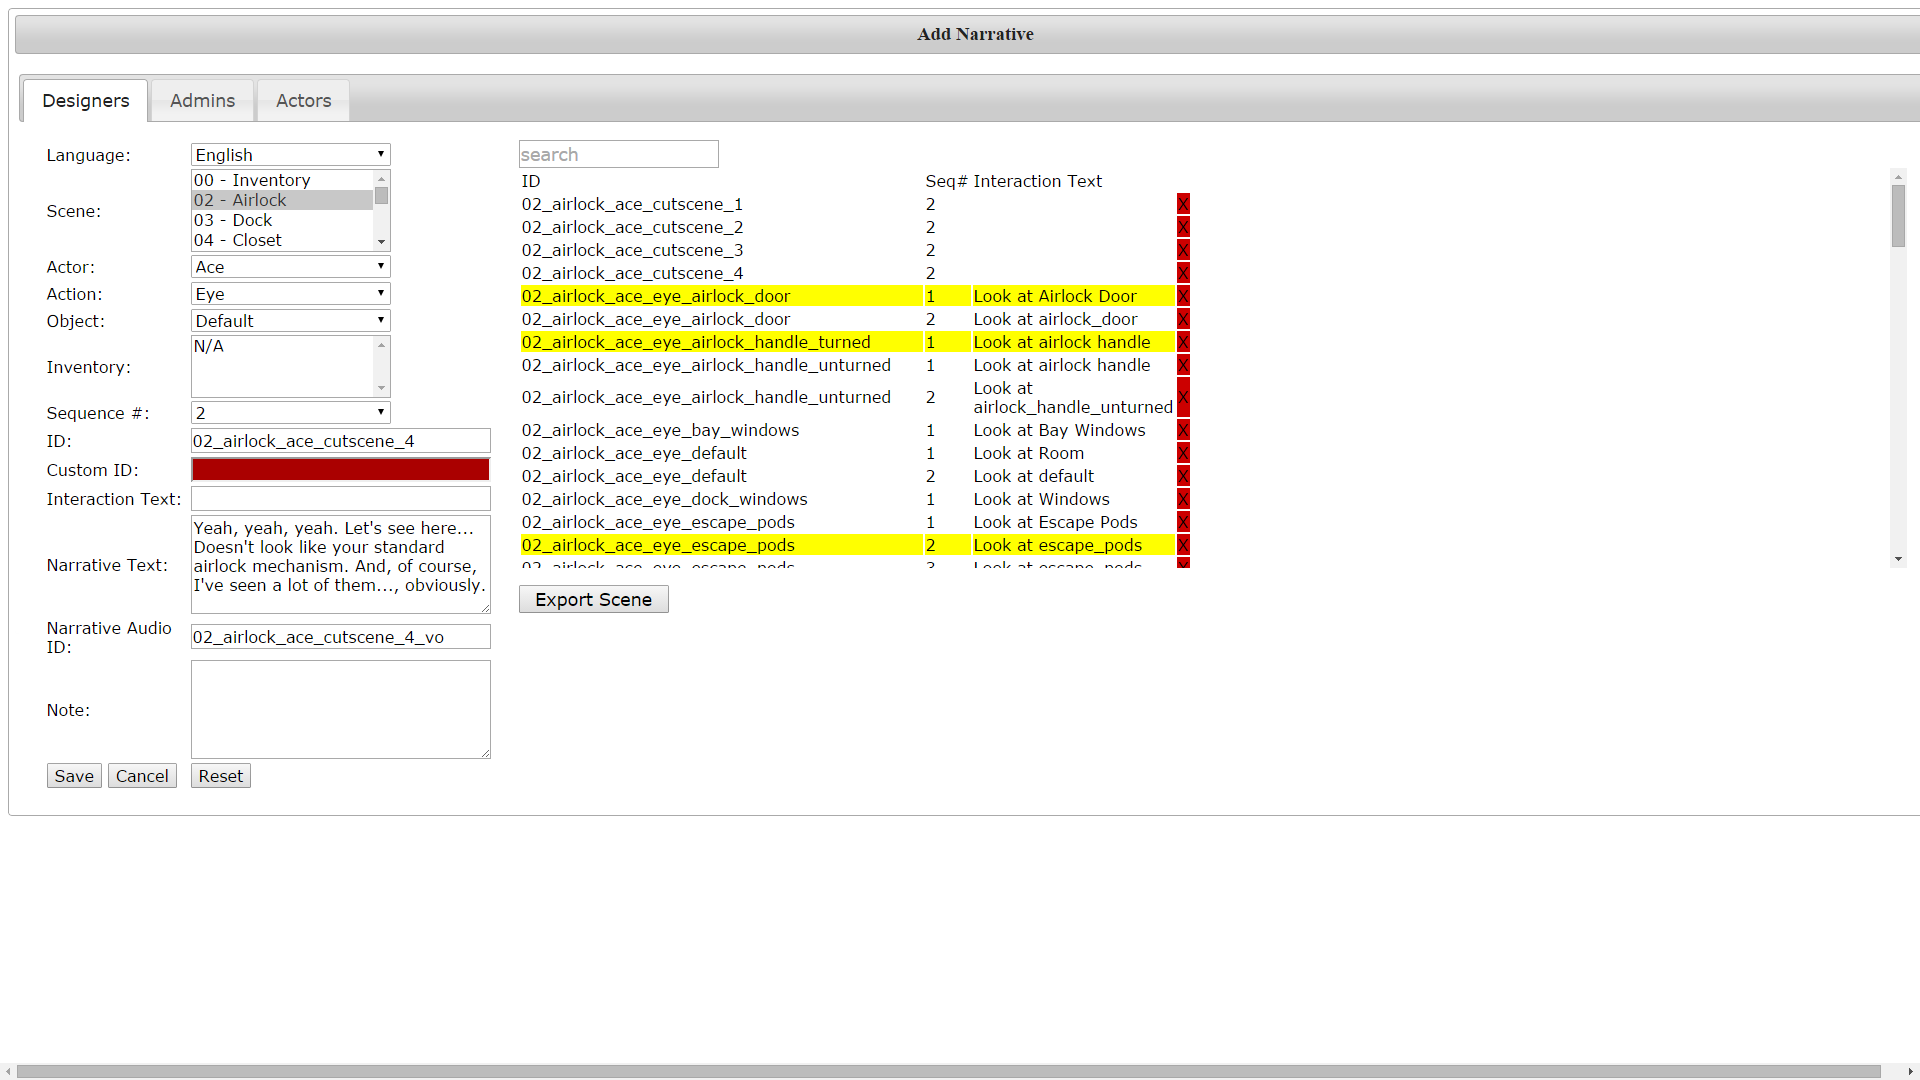
One of the first things I had to tackle when stepping up as lead programmer on the project was re-working the narrative to be actually less object-based. My first and main goal was that narrative lines should be able to be assigned to multiple objects. This meant a bottom-up redesign of the back-end database. I also wanted to get rid of the CSV-based system for Unity. So we needed a way to import data from a web-based database front-end into a serialized asset that Unity could parse. Finally, there were lingering usability concerns with the old narrative – it didn’t tend to make the best use of screen real estate. It was hard to read lines for a given object to see what was already there and edit it quickly.
Getting into it, I started out by quickly drafting the back-end database design on paper. I listed the various tables I would need as well as the fields in each table, including the foreign keys linking one table to another. After getting that set up (fairly roughly at first, the layout would be iterated upon later through trial-and-error) I wrote up some code to access the database, both reading and writing. The front-end of the narrative editor came next.
As you can see from the picture, the narrative writer should select first what scene they are working in, then the object within that scene, then the particular state of the object (has the cart been pushed or hasn’t it). Then they will select what actor (character) is doing the speaking, and what interaction is currently selected (if inventory then the item should be specified). This brings them to a list of “sequences”. Narrative sequences can be randomly or sequentially selected; they can loop after hitting the end of the list or repeat the last sequence indefinitely. When adding a sequence, the writer can either refer to an existing line by its (numeric) ID or add a new line, which fills in the ID automatically. The process is similar for cutscenes and other events, but the way in which they are called is different – they depend on developers referring to them in-game and are not called automatically by the narrative.
Bringing it into Unity
Updating the narrative is now simple
Once I had the basics of the web entry page in place, I used it to create a sample to test importing into Unity. I then wrote a script for Unity to parse the SQL database and serialize the data into its own custom classes. (This happens in the Editor, not in-game; you won’t be needing a connection to the Internet to see narrative). I added a menu option to run this method so that this all happens behind the scenes so that developers wouldn’t have to worry about dragging a CSV file into the right location.
Serialization means Unity can parse the narrative more easily
One of the benefits of serialization is that changes to the narrative can be seen through Unity’s inspector. If the ID of an object is known, a developer can trace back to the line quickly without digging through a text file. Serialization also allows for use of LINQ to quickly query the database and retrieve the correct narrative. When the player clicks on an object, the game code goes through the same drill-down as described in the process for writers in the narrative editor:
What scene are we in? (Also scenes can have states: is the room flooded or isn’t it)
What object is being clicked?
What state is the object in?
What actor is being controlled?
What interaction is being used? Inventory item?
Is there more than one sequence associated with where we are at now? If so, what sequence number should be played? (Should we loop back to the beginning, stay where we are or pick randomly?)
Going through all that should end up with a particular sequence ID which for the game’s purposes will provide the description of the object, if any, as well as the line ID. Referring to the line ID gives the game the text to write out on screen. This all happens within a fraction of a second. If a sequence is not found, the game will play the default narrative for the particular scene (some general comment referring to a nondescript portion of the scene background, usually).
The changes will also make it more easy to translate the narrative into the extra languages gained in the stretch rewards. Formerly, separate CSVs would have been necessary (one for each language), but now each language uses the same line ID to refer to the same line, making switching between languages less complicated.
Lately
This has worked pretty well, there have been a few tweaks made and feature requests (like adding scene states to affect all the objects in the room and not having to change the state of each object in the scene). Making custom classes for the narrative in Unity has made adding little details like that much easier – with CSVs you’d basically have to completely re-format the entire sheet each time something needed to be added, while an entirely database-driven design allows me to just add another table referring to scene states, for example, without affecting other information.
In my next post I plan to talk about recent and upcoming changes to the EventDriven system and re-hash coroutines. Or I might talk about using Unity with version control. Anyone got an opinion on what they want to hear next?